Orka On-Prem Getting Started
With Orka Cluster On-Prem, you can now effortlessly integrate macOS development and macOS CI/CD with your On Prem environments.
With Orka On-Prem, you can now effortlessly integrate macOS development and macOS CI/CD into your On-Prem Mac Compute and Kubernetes-based workflows and environments. Don't have Kubernetes experience on-prem? Don't worry, Macstadium can configure a Hybrid Cluster using any Managed k8s Service like AWS Elastic Kubernetes Service, Google Kubernetes Engine, Azure Kubernetes Service, or using MacStadium hosted Kubernetes.
How does Orka On-Prem work?
The diagram below illustrates the architecture of an Orka Cluster On-Prem, detailing how it integrates with Kubernetes 1.33, Mac compute hosts, and OCI Registries for image storage.
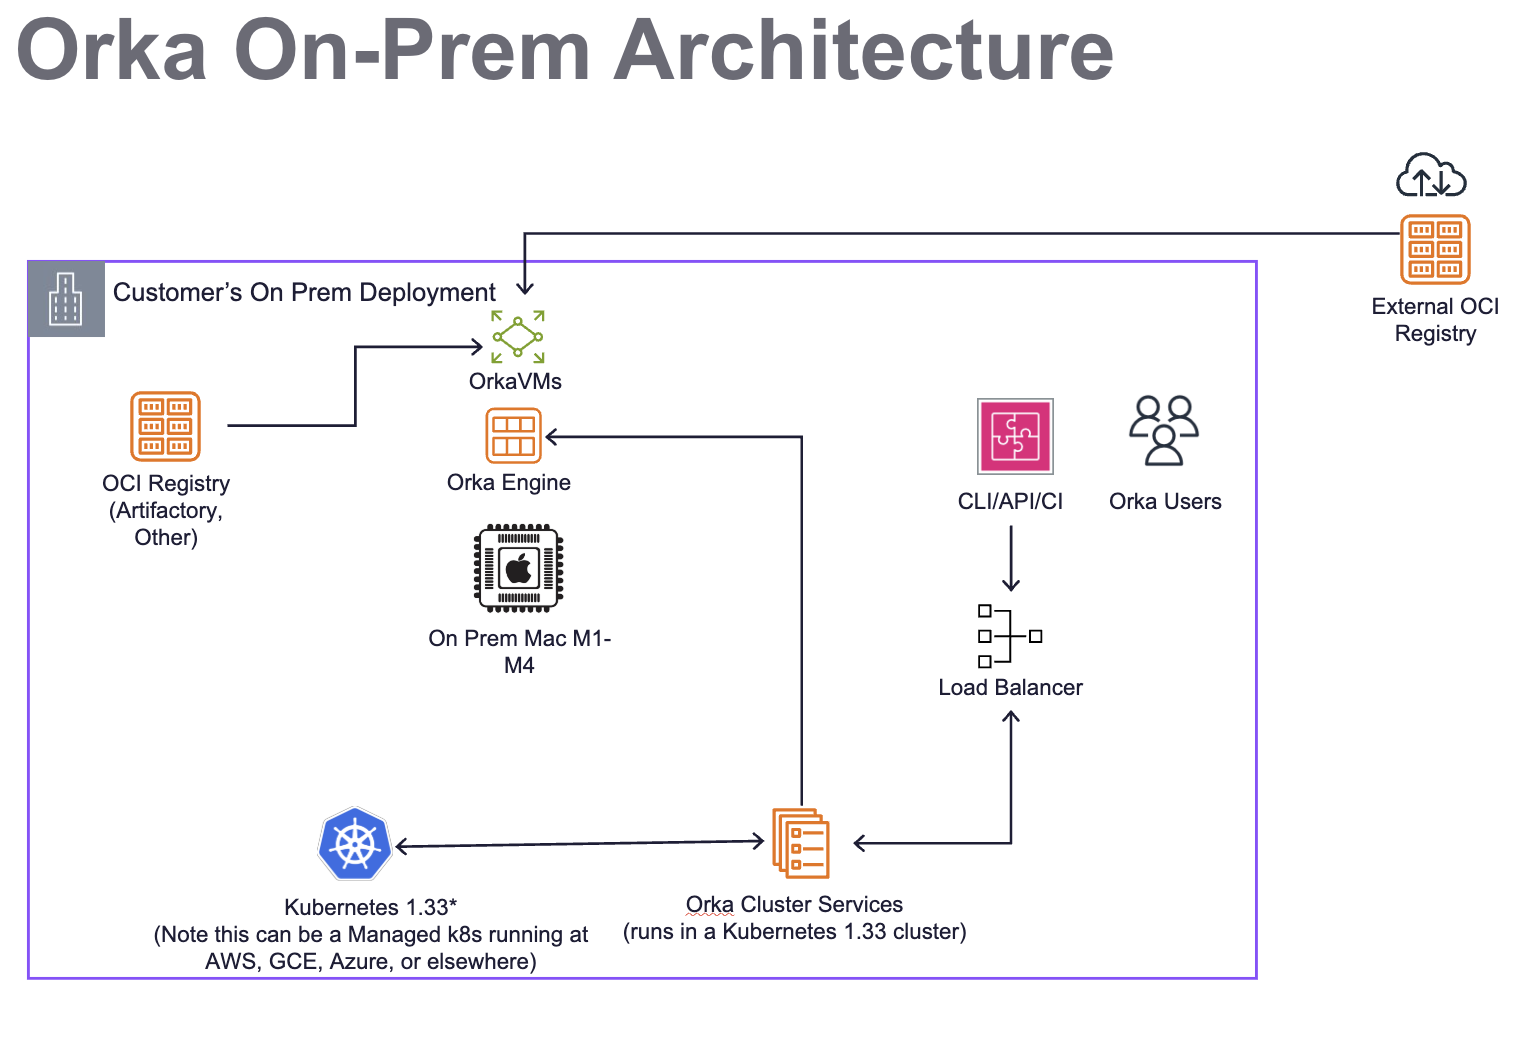
The Kubernetes 1.33 Cluster provides a runtime for the Orka Cluster Services. The Mac hosts are set up with Orka Engine (VM Runtime), which provides a stable runtime for virtual machines. VMs are deployed to the host using an OCI image, which can be fetched from any OCI registry, such as Artifactory, GitHub Container Repo (GHCR), or Amazon ECR. The use of OCI images enables sub-minute deployment of different macOS versions, pre-configured with various tools and optionally with SIP (System Integrity Protection) disabled. This addresses challenges that typically exist on Mac without Orka VMs. CI tools will integrate via the Orka API installed into Kubernetes, or the CLI or API it exposes to orchestrate workloads, including spin-up and tear-down of VMs, and scheduled caching of images as needed.
Key elements in the architecture include:
- A private network configuration for Orka.
- A dedicated Kubernetes 1.33 cluster, which runs Orka Cluster Services for orchestration and automation.
- Mac Nodes to be used for compute, usually on-prem.
- An OCI Registry such as Artifactory, GitHub Container Registry, Docker Registry, AWS ECR, or others..
- A load balancer for Orka Users to interact with the Orka Services on Kubernetes via CLI, API, or CI tools.
Networking Considerations
The Orka VMs use the 192.168.64.0/24 network. This is a virtual network on each of the host and it is not directly accessible.
You might experience issues if your Orka VMs need to access services that are in a network that overlaps with their virtual network.
Install Steps
Kubernetes Requirements and Initial Steps
Orka requires a dedicated Kubernetes 1.33 cluster to run.
- The reason we Orka requires a dedicated cluster is that it limits certain cluster operations (such as what namespaces can be created and what pods can be deployed), and user management is generally more restrictive.
We recommend following the official guidelines for setting up a Kubernetes cluster. The official recommended tool for setting up Kubernets clusters is kubeadm.
If you are familiar with Ansible, you could also use Kubespray to set up your cluster.
If you do not have experience with Kubernetes, MacStadium can host and manage the Kubernetes cluster for you in our Data Centers, or you can use an AWS EKS service to run your Orka Cluster Services.
The following assumes you are installing and managing your own Kubernetes cluster.
Setting up OIDC for Authentication
Orka uses OIDC for user authentication. Make sure to configure the MacStadium OIDC provider in your Kubernetes cluster.
This can be done by setting the following values for your Kubernetes API Server:
  --oidc-issuer-url={{ kube_oidc_url }} # Provided by MacStadium
  --oidc-client-id={{ kube_oidc_client_id }} # Provided by MacStadium
  --oidc-username-claim=email
  --oidc-groups-claim=cognito:groups
  --oidc-username-prefix=-
  '--oidc-groups-prefix=oidc:'
If you are using kubeadm to set up your cluster, you can pass these values as extra args to the apiServer property in the ClusterConfiguration resource:
apiVersion: kubeadm.k8s.io/v1beta3
kind: ClusterConfiguration
...
apiServer:
  extraArgs:
    oidc-issuer-url: "{{ kube_oidc_url }}" # Provided by MacStadium
    oidc-client-id: "{{ kube_oidc_client_id }}" # Provided by MacStadium
    oidc-username-claim: "email"
    oidc-groups-claim: "cognito:groups"
    oidc-username-prefix: "-"
    oidc-groups-prefix: "oidc:"
...
Alternatively, you could also add these manually as ApiServer arguments by editing the ApiServer config file (usually /etc/kubernetes/manifests/kube-apiserver.yaml)
Installing the Orka Cluster Services
MacStadium distributes the Service Images needed to install Orka Cluster On Prem via AWS. As a result, the easiest way to perform an installation is to use some credentials that the MacStadium Support team will provide to gain access to the Ansible image with runners that are used to install.
You will need an environment with outbound internet access to connect to AWS and download the installer (Ansible image). Ideally, this environment can also connect to the Kubernetes API and have admin access to the Kubernetes Cluster. If not, make sure to move the downloaded Ansible image to an environment with the appropriate connectivity and access.
-
Install the AWS CLI in an environment that has outbound access to the internet to connect to AWS and download the installers. Ideally, the same environment will be used to connect to the Kubernetes API and have admin access to the Kubernetes Cluster. If not make sure to move the downloaded Ansible image to an environment that has the appropriate
- Create or update the
~/.aws/configfile to contain the default and runner profile information that can be filled in with additional key and ARN info provided by the MacStadium Support team. The profile runner will be used to pull the Ansible image in the next step. More details about the AWS CLI profiles can be found in their documentation
[profile runner-credentials] aws_access_key_id= # Provided by MacStadium aws_secret_access_key= # Provided by MacStadium [profile runner] role_arn= # Provided by MacStadium source_profile = runner-credentials role_session_name = ansible-runner-session - Create or update the
-
Next, download the Ansible image Ensure the Ansible runner is set up correctly
- The Ansible runner must have connectivity to the cluster API.
- The Ansible runner must have Cluster Admin privileges to set up the cluster (i.e. a kube config with admin privileges
-
Authenticate to ECR so you can pull the Ansible image provided by MacStadium
aws ecr get-login-password --region us-east-1 --profile runner | docker login --username AWS --password-stdin 519920272850.dkr.ecr.us-east-1.amazonaws.comwhere
<profile_name>is the name of the profile you defined. -
On the host create a file called
cluster.yml. This file will contain Ansible variables needed for the Orka setup. Add the following content:k8s_api_address: # The address to the K8s API of your cluster. Must start with the protocol (https:// or http://) kube_oidc_client_id: # Provided by MacStadium aws_access_key_id: # Provided by MacStadium aws_secret_access_key: # Provided by MacStadium add_ecr_registry_role_arn: # Provided by MacStadium aws_s3_access_role_arn: # Provided by MacStadium orka_engine_license_key: # Provided by MacStadium ## Optionally - Configure tolerations and selectors ## This is needed to get the Orka services deployed on the control plane nodes # configure_orka_tolerations: # - key: node-role.kubernetes.io/control-plane # effect: NoSchedule # operator: Exists # orka_node_selector: | # node-role.kubernetes.io/control-plane: "" -
Run the Ansible container:
docker run -it -v <kube_config_location>:/root/.kube/config -v ./cluster.yml:/ansible/group_vars/all/cluster.yml 519920272850.dkr.ecr.us-east-1.amazonaws.com/orka-ansible-onprem:3.4.2 bash
where <kube_config_locaiton> is the location of the kube config file on the host. Typically ~/.kube/config. And cluster.yml is the file created in the previous step.
- Make sure you are in the
/ansibledirectory - You can now run the Ansible playbook:
ansible-playbook site.yml
Exposing the Orka API Service
To use the CLI, you need access to the Orka API service, which is also utilized by some integrations (e.g., Jenkins).
Currently, the service is exposed as ClusterIP service called orka-apiserver in the default namespace.
One way to expose the service is to use something like MetalLB to expose the service as LoadBalancer so it can be reached from outside the cluster.
Setting Up Mac Nodes
Prerequisites
All of your Mac nodes need to:
- Have a common user created. This user needs admin privileges
- SSH is enabled for this user
- An SSH key is setup for this user, so that SSH connections using SSH keys are allowed
python3
Setup
MacStadium provides another Ansible playbook that allows you to configure your Mac nodes with the software needed to run these nodes as Kubernetes worker nodes.
To set up the Mac Nodes:
- Ensure the
cluster.ymlfile is present and the values are correct - Create a new file called nodes.yml with the following content:
host_password: # The password of the user setup on the Mac nodes ansible_user: # The user setup on the Mac nodes - Create an inventory file called
hostswith the following content:[arm-nodes] # Add the IPs of the nodes that need to be configured # One IP per line # (Optional) You can set osx_node_hostname={hostname} next to the IP to set a custom name of the node # (Optional) You can set osx_node_kubelet_node_ip={host_ip} Needed if you want to set a specific IP or the virtual kubelet is unable to resolve it automatically # Example: # 10.221.188.30 osx_node_hostname=mini-1 osx_node_kubelet_node_ip=10.221.188.30 - Run the same Ansible image that was used to configure the Orka services:
docker run -it -v <kube_config_location>:/root/.kube/config -v ./cluster.yml:/ansible/group_vars/all/cluster.yml -v ./nodes.yml:/ansible/group_vars/arm-nodes/nodes.yml -v ./hosts:/ansible/hosts -v <mac_ssh_key_location>:/root/.ssh/id_rsa 519920272850.dkr.ecr.us-east-1.amazonaws.com/orka-ansible-onprem:3.4.2 bash
where <mac_ssh_key_location> is the location of the SSH key used to connect to the Mac nodes.
- Ensure you are in the
/ansibledirectory - Run the configuration playbook:
ansible-playbook configure-arm.yml -i hosts --ask-become-pass
You will be asked for the ansible_user password. This is needed to that Ansible can setup autologin for the hosts. This is needed so you can run Sequoia VMs.
Setting Up Backups
Orka backups are exports of the Orka specific resources within the cluster:
- Orka Nodes
- Virtualmachine configs
- Service Accounts
- RoleBindings
There are two main ways to backup the Orka resources:
- Implement the backup logic yourself
- You define the resources that need to be backed up and how often
- You define where the backups are stored
- Use the functionality provided by MacStadium
- MacStadium provides an Ansible playbook that:
- Sets up a cronjob that runs every 30 min by default
- The cronjob exports the resources mentioned above by default
- The job stores the backups in an S3 bucket that you have specified
Using The MacStadium Provided Backup
To use the MacStadium provided functionality you need to:
-
Create an AWS S3 bucket and generate AWS access id and secret access key that provide permissions to write to the bucket
-
Run the Ansible image provided by MacStadium and mount a backup.yml file with the following content
aws_access_key_id_backup: # The creds that allow access to the S3 bucket aws_secret_access_key_backup: # The creds that allow access to the S3 bucket service_account: admin-user # You can also provide another service account here. It needs cluster-wide admin permissions s3_backup_path: # path to your s3 bucket. For example s3://my-backup-bucket -
Run the container
docker run -it -v \<kube_config_location>:/root/.kube/config -v backup.yml:/ansible/group_vars/all/backup.yml 519920272850.dkr.ecr.us-east-1.amazonaws.com/orka-ansible-onprem:3.4.2 bash -
Run the backup playbook inside the
/ansiblefolderansible-playbook backup.yml
Implementing Your Own Backup
The recommended way to backup Orka resources is via a CronJob, similar to what MacStadium provides out of the box.
The resources you need to backup are:
- All namespaces with the label orka.macstadium.com/namespace
kubectl get namespaces -l orka.macstadium.com/namespace=true -o yaml \
| yq eval 'del(.items[].metadata.resourceVersion, .items[].metadata.uid, .items[].metadata.creationTimestamp, .items[].metadata.annotations, .items[].metadata.spec, .items[].metadata.generation, .items[].status, .items[].spec)'
Note - we are removing some metadata as otherwise restore would fail.
- OrkaNodes, VirtualMachineConfigs, ServiceAccounts, Rolebindings from these namespaces
Note - you need to remove some metadata from these resources. To do that, run the following:kubectl get "$resource" -n "$namespace" -o yaml \ yq eval 'del(.items[].metadata.resourceVersion, .items[].metadata.uid, .items[].metadata.creationTimestamp, .items[].metadata.selfLink, .items[].metadata.managedFields, .items[].metadata.ownerReferences, .items[].metadata.generation, .items[].status)'
These resources can be stored in an yml file, which you can archive and store somewhere.
Logging, Monitoring, and Alerting
OpenTelemetry Standards
Logging and monitoring conform to OpenTelemetry best practices, meaning that metrics can be scraped from the appropriate resources via Prometheus and visualized with Grafana using Prometheus as a data source.
Logs can be exposed on Mac workers installing a promtail service, allowing them to be aggregated through Loki.
Key Log Sources
| What | Resource | Accessing | Purpose |
|---|---|---|---|
| Virtual Kubelet Logs | Mac Node | Via promtail /usr/local/virtual-kubelet/vk.log | Interactions between k8s and worker node for managing virtualization. |
| Orka VM Logs | Mac Node | Via promtail /Users/administrator/.local/state/virtual-kubelet/vm-logs/* | Logs pertaining to the lifecycle of a specific VM |
| Pod Logs | k8s | Kubernetes Client, Kubernetes Dashboard, Helm Chart further exposing logs to a secondary service | All Kubernetes-level behavior |
Key Metrics
A list of metrics covering the following is available: Orka API Server, Orka Operator Metrics.
Updated 21 days ago